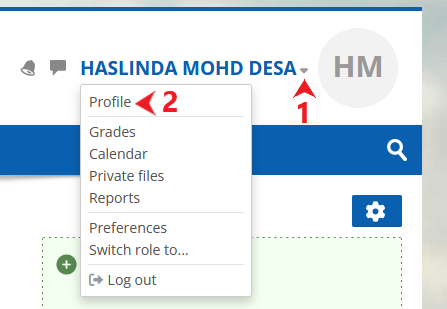
It's where you see your name and an arrow. Click at the arrow(1) to open up the menu (2)
Clicking the Profile link will then display other options, such as a list of your courses, any forum and blog entries and a link to edit your profile.
You can view your due dates, and events at the dashboard.

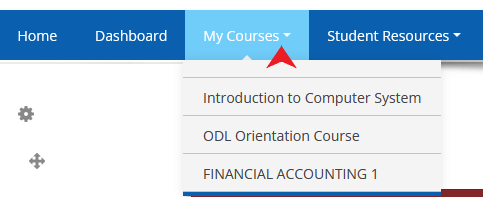
Course is the representation of your subjects.
You can see you course at the menu bar. It will list ALL you registered course for the current semester. Click at any of the listed course will bring you to the course page.
Course formats
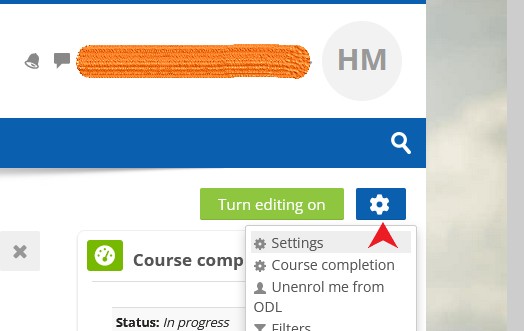
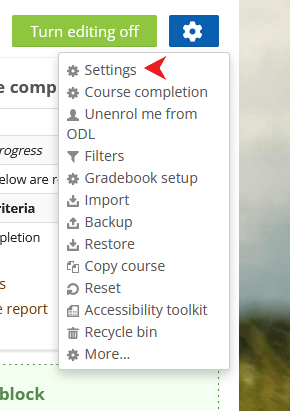
A course format refers to the layout of a course. The course format can be selected in Administration > Course administration > Edit settings.
|
|

or it can be accesses by clicking at the gear icon, at the right side of your screen, below username
Select course format
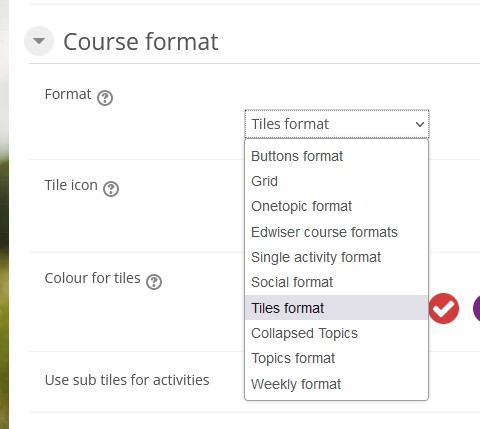
Standard course formats
| Course Format |
Description |
|---|---|
| Weekly format |
The course is organized week by week, with each section having a date heading. Moodle will create a section for each week of your course. You can add content, forums, quizzes, and so on in the section for each week. The current week is highlighted. |
| Topics format |
The course is organised into topic sections that a teacher can give titles to. Each topic section consists of activities, resources and labels. In new installations of Moodle, this is the default format. "Show only one section" With the Weekly, Topics and any contributed format that implements the functionalty, it is possible via Administration > Course administration > Edit settings to "show one section per page". Here is a course with eight topics, with the third one currently shown. The links left and right lead to topics two and four: |
| Collapsed Topics |
This is a format that is essentially the same as the standard Topic and Weekly formats but with a 'toggle' for each section except '0'. The toggles' purpose is to reduce the amount of initial information presented to the user thus reducing the 'scroll of death' that can plague courses with a lot of content. The 'state' of the toggles is remembered on a per course per user basis. For more information, please visit Collapsed_Topics_course_format. |
| Onetopic format |
The onetopic format shows each topic in a tab, keeping the current tab between calls to resources, in such a way that when it returns from a module as the blog or the glossary it returns to tab from where you started. This format is based on the Moodle standard format: “Topics”. |
| Tiles format |
The tiles format displays course topics as "Tiles", rather than as a list. When clicked, tile content is displayed under the tile with an animated transition. The layout adapts to different screen sizes and orientations. Within each tile, activities can also be set to display as "sub-tiles". Icons for each tile can be selected from a predefined set (i.e. the teacher does not need to upload them). |
| Topic format (colors) |
The colored topic format is based on the 'Topics' standard format and allows a teacher to specify the foreground and background colours for each course section. |
A resource is an item that a teacher can use to support learning, such as a file or link. Moodle supports a range of resource types which teachers can add to their courses. In edit mode, a teacher can add resources via the 'Add an activity or resource' link. Resources appear as a single link with an icon in front of it that represents the type of resource.
Administrators can decide whether or not to force teachers to add descriptions for each resource by enabling or disabling a site-wide setting in Administration > Plugins > Activity modules > Common settings.
- Book - Multi-page resources with a book-like format. Teachers can export their Books as IMS CP (admin must allow teacher role to export IMS)
- File - A picture, a pdf document, a spreadsheet, a sound file, a video file
- Folder - For helping organize files and one folder may contain other folders
- IMS content package - Add static material from other sources in the standard IMS content package format
- Page - The student sees a single, scrollable screen that a teacher creates with the robust HTML editor
- Text and media area - Can be a few displayed words or an image used to separate resources and activities in a topic section, or can be a lengthy description or instructions
- URL - You can send the student to any place they can reach on their web browser, for example Wikipedia
An activity is a general name for a group of features in a Moodle course. Usually an activity is something that a student will do that interacts with other students and or the teacher.
In Moodle terminology, an Activity, such as Forums or Quizzes, properly means something students can contribute to directly, and is often contrasted to a Resource such as a File or Page, which is presented by the teacher to them. However, the term activity is sometimes for convenience also used to refer to both Activities and Resources as a group.
There are 15 different types of activities in the standard Moodle that can be found when the editing is turned on and the link 'Add an activity or resource' is clicked.
- Assignments
- Enable teachers to grade and give comments on uploaded files and assignments created on and off line
- BigBlueButton
- Run live video conferencing sessions within Moodle
- Chat
- Allows participants to have a real-time synchronous discussion
- Choice
- A teacher asks a question and specifies a choice of multiple responses
- Database
- Enables participants to create, maintain and search a bank of record entries
- Feedback
- For creating and conducting surveys to collect feedback.
- Forum
- Allows participants to have asynchronous discussions
- Glossary
- Enables participants to create and maintain a list of definitions, like a dictionary
- H5P activity
- Enables H5P content created in the Content bank or on h5p.com or with the lumi App to be easily added to a course as an activity.
- Lesson
- For delivering content in flexible ways
- (LTI) External tool
- Allows participants to interact with LTI compliant learning resources and activities on other web sites. (These must first be set up by an administrator on the site before being available in individual courses.)
- Quiz
- Allows the teacher to design and set quiz tests, which may be automatically marked and feedback and/or to correct answers shown
- SCORM
- Enables SCORM packages to be included as course content
- Survey
- For gathering data from students to help teachers learn about their class and reflect on their own teaching
- Wiki
- A collection of web pages that anyone can add to or edit
- Workshop
- Enables peer assessment
- On the Moodle course home page, click Turn editing
on at the upper right of the page.
 .
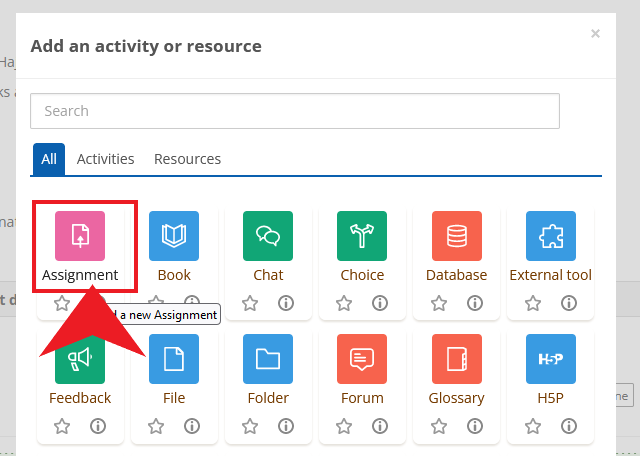
. - In the relevant page section, click Add an activity or resource and in the resulting pop-up, under ACTIVITIES, select Assignment.
- Enter the following details

| Item |
Description |
|---|---|
| Description |
It should contain all the instructions for formatting and submitting the assignment, as well as grading criteria. You may want to add a link to a rubric document. Be as detailed about your expectations as possible, especially early in the semester, to minimise questions, issues and anxiety for your students. Select the Display description check box if you want the text you entered in the Description to display on the course home page below the assignment's link. |
| Availability |
Selecting Enable and specifying dates and times at which you want to Allow submissions, the Due date, the Cut-off date and Remind me to grade by. If you select No at Always show description, the text in the Description field will only display to students on and after the Allow submissions from date.
|
| Submission types |
|
| Feedback types |
|
| Group submission |
|
| Notifications |
|
| Grade |
|

- Complete the remainder of the sections as you would for any other Moodle activity. If this is a group assignment, complete the extra steps below the graphic.
Enabling course completion
By default, course completion tracking is enable. A teacher can change activity completion (completion tracking) for their course from Course administration > Settings, and then change course completion from Course completion.
The information below explains the settings in the Course completion tab. See Activity completion settings for the Default activity completion and Bulk edit activity completion tabs.
|
|
|
|---|---|
General |
Choose here how you wish to mark the course complete -whether you want Any or All of the requirements that follow to count towards completion. |
Condition:Activity completion |
Tick the boxes of the activities you wish to count towards completion of the course. (You need to have Activity completion enabled to be able to do this. You can decide whether ALL of the activities must be completed or ANY one of them. After completing the selection click on edit, review all the activities and then save them. [Activity completion] can be reviewed and changed in the tab Bulk edit activity completion Tab. Here you can select all those activities and edit activity completion criterion and apply that too all the selected activities and save. |
Condition:Completion of other courses |
This setting allows you to make "the completion of another course" as a condition for completing the course you are currently working in. This does not block the student from your current course; it simply means that the current course will not be marked complete until the first course has been marked complete. Thus, completion of the current course is dependent upon completion of an earlier course. Just select one or more courses in the "Courses available box". Note: To remove a course from the list if it is not required, press CTRL+click on the highlighted course and it will be deselected. |
Condition: Date |
If you tick the Enable box you can then set a date after which the course will be declared complete. |
Condition: Enrolment duration |
If you tick the Enable box you can then choose a number of days after enrolment upon which the course will be marked complete. |
Condition: Unenrolment |
If you tick "Enable" here then the course will be marked complete once the student is unenrolled. |
Condition: Course grade |
If you tick the Enable box, you can set a passing grade for the course. Please note that course grade in Completion status is looking at total of points (rawgrade) rather than a percentage. |
Condition: Manual self-completion |
If this is enabled then a student can mark the course complete themselves from the Self completion block. |
Condition: Manual completion by others |
Users with selected roles may mark the course as complete if their role
is ticked here. The roles listed are ones for which the capability Mark users as complete in course completion is allowed. ALL means that each role must mark the course complete before; ANY means that it will be classed as complete once one role has marked it complete. |